
7 Days to Die Server Manager
WindowsGSM 7 Days to Die Server Manager
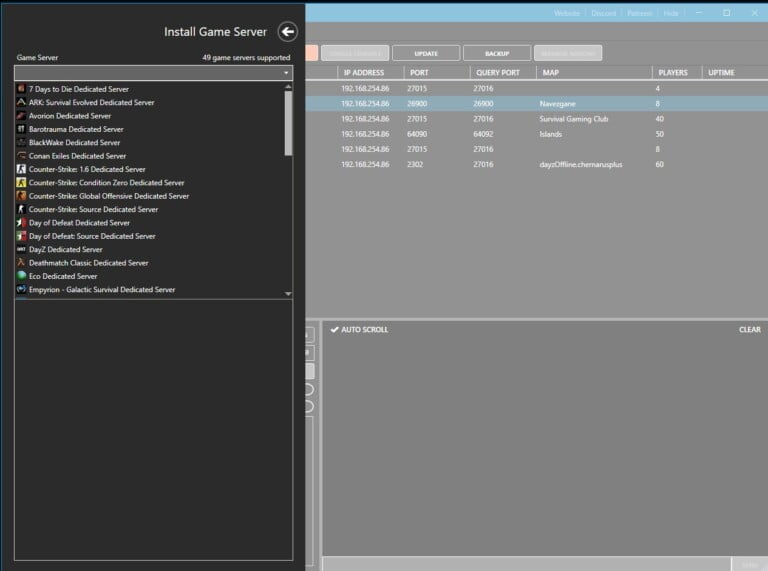
Step 1
Setting up 7 Days to Die server manager is super easy. After you have installed the Windows Game Server Manager simply go to Servers, in the top left, select install, A window will open up, you select the server from the list, change the server name, this is what shows up under server name on the main screen, and click install. BOOM DONE! Well almost, it will run right now, but unless you open the server ports you won’t be able to connect, plus you probably want to change the server name.
Note: If you do not have windows server manager, see this page WindowsGSM
Note: If you don’t want to leave your computer on all the time, another option is server hosting, I work together with G-Portal and Survival Servers. Mostly G-Portal but sometimes on popular games they can become full. G-Portal offers a discount If you use my link.

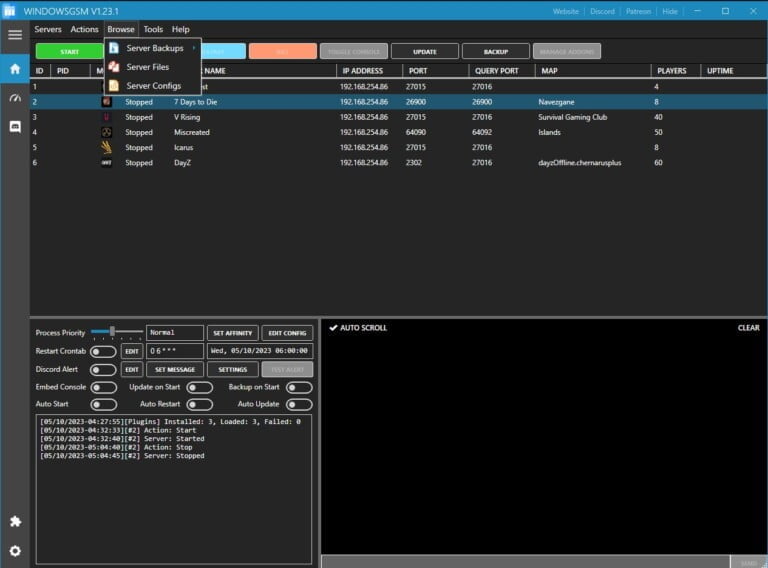
Step 2
Select the server, click the Browse button and then Server Files, in the list of files currently showing should be a serverconfig xml file, that is the one you want to edit, simply set the server name and any other server changes you want to make. I like to copy the file and name it serverconfig.bak so I have a reference if I delete something by accident.
Step 3
Open some ports
Controlpanelport 8080
TelnetPort 8081
ServerGamePort 26900 Game Communication Port
If you don’t know how to forward ports in your router, this page should have everything you need. It is quiet easy to do if you have the username and password to the router.
Port Forwarding.com is the best resource I have found, Click this link and find your router to learn how to forward ports.
Step 4
Server Configuration,
At the top of Windows Server Manager under Browse Server Files, which opens windows file explorer and automatically locates your server files.
There is a file called, wait for it, serverconfig.xml, you have already edited this file in step 2. Right Click and edit this file with notepad or notepad++
As always I recommend using Note++ to edit any config file.
Note: You will want to set the name and region in this file, so you can locate your server in the server search when starting a game.
You can change these options
Options
<ServerSettings>
	<!-- GENERAL SERVER SETTINGS -->

	<!-- Server representation -->
	<property name="ServerName"
	 value="My Game Host"/>		<!-- Whatever you want the name of the server to be. -->
	<property name="ServerDescription"
         value="A 7 Days to Die server"/>	<!-- Whatever you want the server description to be, will be shown
 in the server browser. -->
	<property name="ServerWebsiteURL"
         value=""/>			<!-- Website URL for the server, will be shown in the serverbrowser as a
 clickable link -->
	<property name="ServerPassword"
         value=""/>			<!-- Password to gain entry to the server -->
	<property name="ServerLoginConfirmationText"
         value="" />			<!-- If set the user will see the message during joining the server and has
 to confirm it before continuing. For more complex changes to this window you can change the "serverjoinrulesdialog"
 window in XUi -->
	<property name="Region"
         value="NorthAmericaEast" />	<!-- The region this server is in. Values: NorthAmericaEast, NorthAmericaWest,
 CentralAmerica, SouthAmerica, Europe, Russia, Asia, MiddleEast, Africa, Oceania -->
	<property name="Language"
         value="English" />		<!-- Primary language for players on this server. Values: Use any language name
 that you would users expect to search for. Should be the English name of the language, e.g. not "Deutsch" but "German" -->

	<!-- Networking -->
	<property name="ServerPort"
	value="26900"/>			<!-- Port you want the server to listen on. Keep it in the ranges 26900 to
26905 or 27015 to 27020 if you want PCs on the same LAN to find it as a LAN server. -->
	<property name="ServerVisibility"
	value="2"/>			<!-- Visibility of this server: 2 = public, 1 = only shown to friends, 0 = not
listed. As you are never friend of a dedicated server setting this to "1" will only work when the first player connects
manually by IP. -->
	<property name="ServerDisabledNetworkProtocols"
        value="SteamNetworking"/>	<!-- Networking protocols that should not be used. Separated by comma. Possible
 values: LiteNetLib, SteamNetworking. Dedicated servers should disable SteamNetworking ifthere is no NAT router in between
 your users and the server or when port-forwarding is set up correctly -->
	<property name="ServerMaxWorldTransferSpeedKiBs"
        value="512"/>			<!-- Maximum (!) speed in kiB/s the world is transferred at to a client on first
 connect if it does not have the world yet. Maximum is about 1300 kiB/s, even if you set a higher value. -->

	<!-- Slots -->
	<property name="ServerMaxPlayerCount"
        value="8"/>			<!-- Maximum Concurrent Players -->
	<property name="ServerReservedSlots"
	value="0"/>			<!-- Out of the MaxPlayerCount this many slots can only be used by players with
 a specific permission level -->
	<property name="ServerReservedSlotsPermission"
        value="100"/>			<!-- Required permission level to use reserved slots above -->
	<property name="ServerAdminSlots"
	value="0"/>			<!-- This many admins can still join even if the server has reached MaxPlayerCount -->
	<property name="ServerAdminSlotsPermission"
        value="0"/>			<!-- Required permission level to use the admin slots above -->

	<!-- Admin interfaces -->
	<property name="ControlPanelEnabled"
        value="false"/>			<!-- Enable/Disable the web control panel -->
	<property name="ControlPanelPort"
	value="8080"/>			<!-- Port of the control panel webpage -->
	<property name="ControlPanelPassword"
	value="CHANGEME"/>		<!-- Password to gain entry to the control panel -->

	<property name="TelnetEnabled"
	value="true"/>			<!-- Enable/Disable the telnet -->
	<property name="TelnetPort"
	value="8081"/>			<!-- Port of the telnet server -->
	<property name="TelnetPassword"
	value=""/>			<!-- Password to gain entry to telnet interface. If no password is set the
server will only listen on the local loopback interface -->
	<property name="TelnetFailedLoginLimit"
	value="10"/>			<!-- After this many wrong passwords from a single remote client the client
will be blocked from connecting to the Telnet interface -->
	<property name="TelnetFailedLoginsBlocktime"
        value="10"/>			<!-- How long will the block persist (in seconds) -->

	<property name="TerminalWindowEnabled"
        value="true"/>			<!-- Show a terminal window for log output / command input (Windows only) -->

	<!-- Folder and file locations -->
	<property name="AdminFileName"
	value="serveradmin.xml"/>	<!-- Server admin file name. Path relative to the SaveGameFolder -->
	<!-- <property name="UserDataFolder"
	value="absolute path" /> -->	<!-- Use this to override where the server stores all generated data, including
 RWG generated worlds. Do not forget to uncomment the entry! -->
	<!-- <property name="SaveGameFolder"
	value="absolute path" /> -->	<!-- Use this to only override the save game path. Do not forget to uncomment
the entry! -->

	<!-- Other technical settings -->
	<property name="EACEnabled"
	value="true"/>			<!-- Enables/Disables EasyAntiCheat -->
	<property name="HideCommandExecutionLog"
	value="0"/>			<!-- Hide logging of command execution. 0 = show everything, 1 = hide only
from Telnet/ControlPanel, 2 = also hide from remote game clients, 3 = hide everything -->
	<property name="MaxUncoveredMapChunksPerPlayer"
        value="131072"/>		<!-- Override how many chunks can be uncovered on the ingame map by each player
. Resulting max map file size limit per player is (x * 512 Bytes), uncovered area is(x * 256 m²). Default 131072 means
max 32 km² can be uncovered at any time -->
	<property name="PersistentPlayerProfiles"
        value="false" />		<!-- If disabled a player can join with any selected profile. If true they will
 join with the last profile they joined with -->


	<!-- GAMEPLAY -->

	<!-- World -->
	<property name="GameWorld"
	value="Navezgane"/>		<!-- "RWG" (see WorldGenSeed and WorldGenSize options below) or any already
existing world name in the Worlds folder (currently shipping with e.g. "Navezgane", "PREGEN01", ...) -->
	<property name="WorldGenSeed"
	value="asdf"/>			<!-- If RWG this is the seed for the generation of the new world. If a world
with the resulting name already exists it will simply load it -->
	<property name="WorldGenSize"
	value="6144"/>			<!-- If RWG this controls the width and height of the created world. It is
also used in combination with WorldGenSeed to create the internal RWG seed thus also creating a unique map name even
 if using the same WorldGenSeed. Has to be a multiple of 2048 between 2048 and 16384, though large map sizes will
take long to generate / download / load -->
	<property name="GameName"
	value="My Game"/>		<!-- Whatever you want the game name to be. This affects the save game name
 as well as the seed used when placing decoration (trees etc) in the world. It does not control the generic layout
 of the world if creating an RWG world -->
	<property name="GameMode"
	value="GameModeSurvival"/>	<!-- GameModeSurvival -->

	<!-- Difficulty -->
	<property name="GameDifficulty"
	value="2"/>			<!-- 0 - 5, 0=easiest, 5=hardest -->
	<property name="BlockDamagePlayer"
	value="100" />			<!-- How much damage do players to blocks (percentage in whole numbers) -->
	<property name="BlockDamageAI"
	value="100" />			<!-- How much damage do AIs to blocks (percentage in whole numbers) -->
	<property name="BlockDamageAIBM"
	value="100" />			<!-- How much damage do AIs during blood moons to blocks
(percentage in whole numbers) -->
	<property name="XPMultiplier"
	value="100" />			<!-- XP gain multiplier (percentage in whole numbers) -->
	<property name="PlayerSafeZoneLevel"
	value="5" />			<!-- If a player is less or equal this level he will create a safe zone
(no enemies) when spawned -->
	<property name="PlayerSafeZoneHours"
        value="5" />			<!-- Hours in world time this safe zone exists -->

	<!--  -->
	<property name="BuildCreate"
	value="false" />		<!-- cheat mode on/off -->
	<property name="DayNightLength"
	value="60" />			<!-- real time minutes per in game day: 60 minutes -->
	<property name="DayLightLength"
	value="18" />			<!-- in game hours the sun shines per day: 18 hours day light per in game day -->
	<property name="DropOnDeath"
	value="1" />			<!-- 0 = nothing, 1 = everything, 2 = toolbelt only, 3 = backpack only,
 4 = delete all -->
	<property name="DropOnQuit"
	value="0" />			<!-- 0 = nothing, 1 = everything, 2 = toolbelt only, 3 = backpack only -->
	<property name="BedrollDeadZoneSize"
        value="15" />			<!-- Size (box "radius", so a box with 2 times the given value for each side's
 length) of bedroll deadzone, no zombies will spawn inside this area, and any cleared sleeper volumes that touch a bedroll
 deadzone will not spawn after they've been cleared. -->
	<property name="BedrollExpiryTime"
	value="45" />			<!-- Number of real world days a bedroll stays active after owner was last online -->

	<!-- Performance related -->
	<property name="MaxSpawnedZombies"
	value="64" />			<!-- This setting covers the entire map. There can only be this many zombies on
 the entire map at one time. Changing this setting has a huge impact on performance. -->
	<property name="MaxSpawnedAnimals"
	value="50" />			<!-- If your server has a large number of players you can increase this limit to
 add more wildlife. Animals don't consume as much CPU as zombies. NOTE: That this doesn'tcause more animals to spawn
arbitrarily:
 The biome spawning system only spawns a certain number of animals in a given area, but if you have lots of players that are
 all spread out then you may be hitting the limit and can increase it. -->
	<property name="ServerMaxAllowedViewDistance"
         value="12" />			<!-- Max viewdistance a client may request (6 - 12). High impact on memory usage
 and performance. -->

	<!-- Zombie settings -->
	<property name="EnemySpawnMode"
	value="true" />			<!-- Enable/Disable enemy spawning -->
	<property name="EnemyDifficulty"
	value="0" />			<!-- 0 = Normal, 1 = Feral -->
	<property name="ZombieFeralSense"
	value="0" />			<!-- 0-3 (Off, Day, Night, All) -->
	<property name="ZombieMove"
	value="0" />		        <!-- 0-4 (walk, jog, run, sprint, nightmare) -->
	<property name="ZombieMoveNight"
	value="3" />			<!-- 0-4 (walk, jog, run, sprint, nightmare) -->
	<property name="ZombieFeralMove"
	value="3" />			<!-- 0-4 (walk, jog, run, sprint, nightmare) -->
	<property name="ZombieBMMove"
	value="3" />			<!-- 0-4 (walk, jog, run, sprint, nightmare) -->
	<property name="BloodMoonFrequency"
	value="7" />			<!-- What frequency (in days) should a blood moon take place. Set to "0" for
 no blood moons -->
	<property name="BloodMoonRange"
	value="8" />			<!-- The Hour number that the red day number begins on a blood moon day. Setting
this to -1 makes the red never show.  -->
	<property name="BloodMoonEnemyCount"
        value="8" />			<!-- This is the number of zombies that can be alive (spawned at the same time) at
 any time PER PLAYER during a blood moon horde, however, MaxSpawnedZombies overrides this number in multiplayer games. Also
note that your game stage sets the max number of zombies PER PARTY. Low game stage values can result in lower number of zombies
 than the BloodMoonEnemyCount setting. Changing this setting has a huge impact on performance. -->

	<!-- Loot -->
	<property name="LootAbundance"
	value="100" />			<!-- percentage in whole numbers -->
	<property name="LootRespawnDays"
	value="7" />			<!-- days in whole numbers -->
	<property name="AirDropFrequency"
	value="72"/>			<!-- How often airdrop occur in game-hours, 0 == never -->
	<property name="AirDropMarker"
	value="false"/>			<!-- Sets if a marker is added to map/compass for air drops. -->

	<!-- Multiplayer -->
	<property name="PartySharedKillRange"
        value="100"/>			<!-- The distance you must be within to receive party shared kill xp and quest
 party kill objective credit. -->
	<property name="PlayerKillingMode"
	value="3" />			<!-- Player Killing Settings (0 = No Killing, 1 = Kill Allies Only, 2 = Kill
Strangers Only, 3 = Kill Everyone) -->

	<!-- Land claim options -->
	<property name="LandClaimCount"
	value="1"/>			<!-- Maximum allowed land claims per player. -->
	<property name="LandClaimSize"
	value="41"/>			<!-- Size in blocks that is protected by a keystone -->
	<property name="LandClaimDeadZone"
	value="30"/>			<!-- Keystones must be this many blocks apart (unless you are friends with the
 other player) -->
	<property name="LandClaimExpiryTime"
        value="7"/>			<!-- The number of real world days a player can be offline before their claims
expire and are no longer protected -->
	<property name="LandClaimDecayMode"
	value="0"/>			<!-- Controls how offline players land claims decay. 0=Slow (Linear) , 1=Fast
(Exponential), 2=None (Full protection until claim is expired). -->
	<property name="LandClaimOnlineDurabilityModifier"
        value="4"/>			<!-- How much protected claim area block hardness is increased when a player is
 online. 0 means infinite (no damage will ever be taken). Default is 4x -->
	<property name="LandClaimOfflineDurabilityModifier"
        value="4"/>			<!-- How much protected claim area block hardness is increased when a player is
 offline. 0 means infinite (no damage will ever be taken). Default is 4x -->
	<property name="LandClaimOfflineDelay"
        value="0"/>			<!-- The number of minutes after a player logs out that the land claim area hardness
 transitions from online to offline. Default is 0 -->


	<property name="DynamicMeshEnabled"
	value="true"/>			<!-- Is Dynamic Mesh system enabled -->
	<property name="DynamicMeshLandClaimOnly"
        value="true"/>			<!-- Is Dynamic Mesh system only active in player LCB areas -->
	<property name="DynamicMeshLandClaimBuffer"
        value="3"/>			<!-- Dynamic Mesh LCB chunk radius -->
	<property name="DynamicMeshMaxItemCache"
        value="3"/>			<!-- How many items can be processed concurrently, higher values use more RAM -->

	<property name="TwitchServerPermission"
        value="90"/>			<!-- Required permission level to use twitch integration on the server -->
	<property name="TwitchBloodMoonAllowed"
        value="false"/>			<!-- If the server allows twitch actions during a blood moon. This could cause
server lag with extra zombies being spawned during blood moon. -->

	<!-- There are several game settings that you cannot change when starting a new game.
	You can use console commands to change at least some of them ingame.
	setgamepref BedrollDeadZoneSize 30 -->
</ServerSettings>
Note: If you don’t want to leave your computer on all the time, another option is server hosting, I work together with G-Portal and Survival Servers. Mostly G-Portal but sometimes on popular games they can become full. G-Portal offers a discount If you use my link.